

How to Replace Your 6.7L Cummins EGR Valve — Step-by-Step DIY Save $800
If you drive a 6.7L Cummins-powered Dodge Ram 2500 or 3500, you already know it is an absolute workhorse. But if your dashboard suddenly lights up with a Check Engine Light paired with trouble codes like P0401 or P0404, your truck is falling victim to the most notorious bottleneck in modern diesel engineering: the Exhaust Gas Recirculation (EGR) system.
Dealerships and diesel performance shops regularly charge anywhere from $900 to $1,200 to replace a clogged factory EGR valve and service the cooler assembly. In reality, the job requires only basic hand tools, a couple of hours in your garage. By doing it yourself, you can pocket a clean $800 in labor savings.
Why the 6.7L Cummins EGR System Fails
The factory EGR system has a frustrating operational mandate: it takes dirty, spent exhaust gases from your exhaust manifold, routes them through a cooling core, and forces them back into your fresh intake air charge to lower combustion temperatures.
While effective on paper, the mechanical reality is brutal on an inline-six Cummins:
-
Sticky Carbon Coating: Heavy carbon particulate matter mixes with oily crankcase vapors, creating a thick, tar-like sludge that glues the internal EGR valve actuator shut.
-
Intake Suffocation: This sticky soot chokes out your intake throttle body, reduces your fuel mileage, and causes a noticeable low-end throttle lag.
-
Thermal Stress: Sending scorching-hot exhaust through your engine coolant system spikes your overall operating temperatures, putting unnecessary thermal strain on the back cylinders of your inline-six head.
Below is the comprehensive, step-by-step blueprint to tear down your problematic factory system, along with the top-tier competition hardware upgrades to keep your engine breathing completely unhindered.
Tools & Supplies Needed
Before turning a single wrench, clear off your workbench and gather the following gear:
- 3/8” Drive Ratchet and Extension set
- Metric Socket set (10mm, 11mm, 13mm, and 15mm)
- Metric Combination wrenches
- Torque wrench (inch-pounds and foot-pounds)
- Dedicated electronics parts cleaner or degreaser
- Replacement gaskets or high-temperature anti-seize
Part 1: Step-by-Step Factory Disassembly
Safety Note: Ensure the truck has been parked for at least 3 to 4 hours. The EGR cooler and exhaust crossover tube retain intense thermal heat long after the engine is turned off.
Step 1: Disconnect Batteries and Drain Coolant
Pop the hood and disconnect both negative battery cables. Locate the radiator drain petcock on the driver’s side bottom of the radiator and drain roughly 2 to 3 gallons of engine coolant into a clean bucket.
Step 2: Remove the Exhaust Crossover Tube
Locate the long metal tube running across the front of the engine block connecting the exhaust manifold to the EGR valve assembly. Unbolt the heat shield, loosen the v-band clamps at both ends using an 11mm socket, and remove the two 13mm mounting bolts securing the center support bracket to the water pump structure. Carefully pull the crossover tube free.
Step 3: Isolate and Unplug the Actuator Wiring
Carefully press the locking tabs to slide off the electrical wiring harnesses connected to the EGR valve actuator and the intake throttle valve assembly. Tuck these harnesses safely away from the workspace to avoid solvent contamination.
Step 4: Extract the EGR Valve Assembly
Unbolt the vertical mounting bolts holding the EGR valve housing to the intake manifold tract. If your truck has high mileage, the valve body will likely be chemically fused to the base gasket due to baked soot. Gently tap the base of the housing with a rubber mallet to break the seal, then lift the valve out of the engine bay.
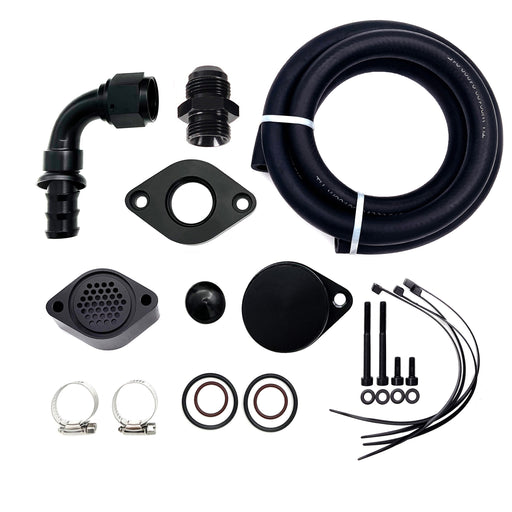
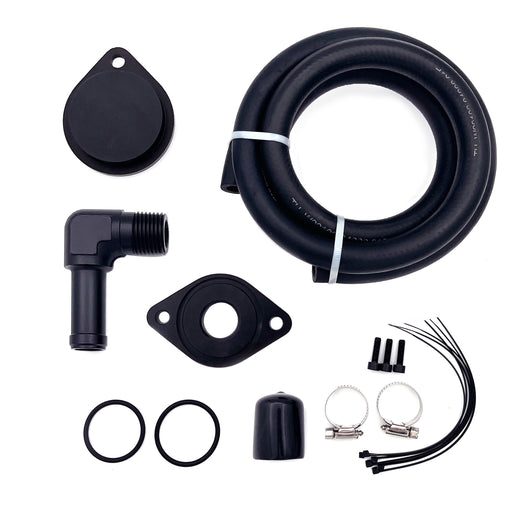
Step-by-Step Competition Kit Assembly
Once the factory restriction is out, it is time to install your new precision-machined aluminum hardware to re-establish a sealed, high-flow system.
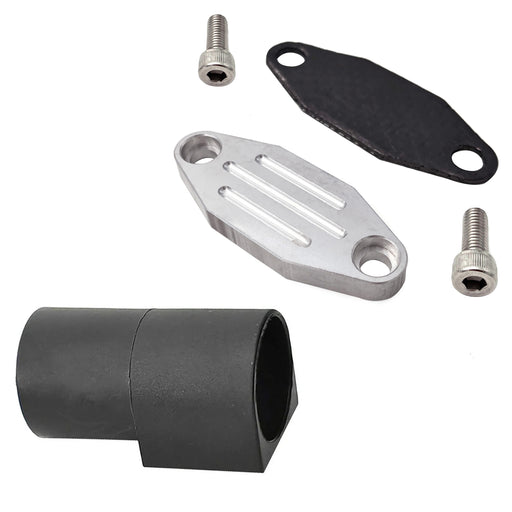
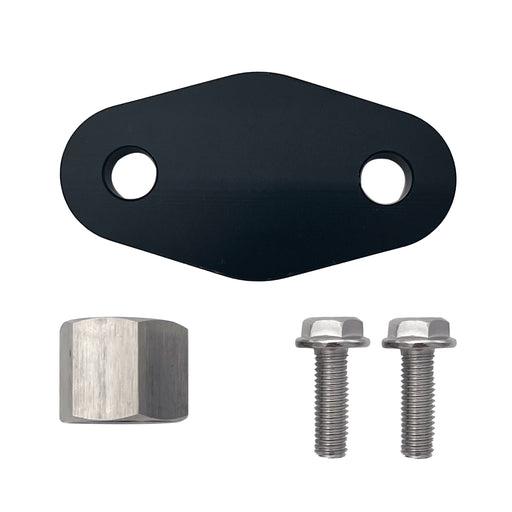
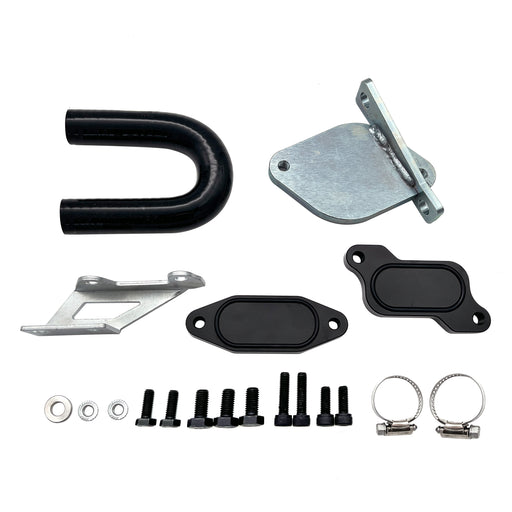
Step 1: Install the Exhaust Manifold Block-Off Plates
Clean the exhaust manifold mating surface with a Scotch-Brite pad to remove any old carbon scale. Lay down the heavy-duty gasket provided in your kit, position the thick billet aluminum exhaust block-off plate over the port, and hand-start the bolts.
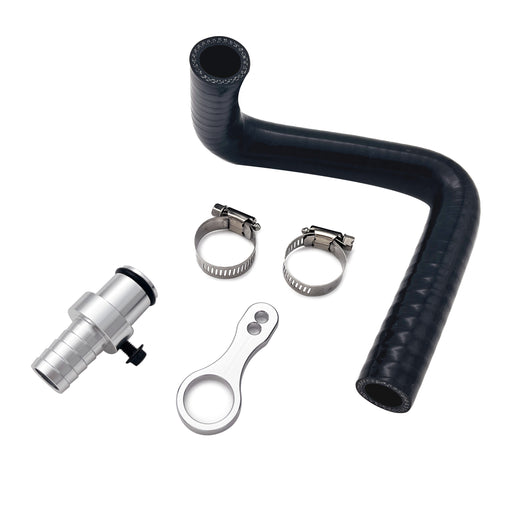
Step 2: Reroute the Vital Coolant Circuit
Take the high-durability silicone coolant hose from your kit. Connect one end to the coolant port at the front of the block near the thermostat housing, and route the other end directly to the rear of the cylinder head between cylinders 5 and 6 using the integrated DDC riser bracket. Secure both ends tightly with the provided heavy-duty T-bolt clamps.
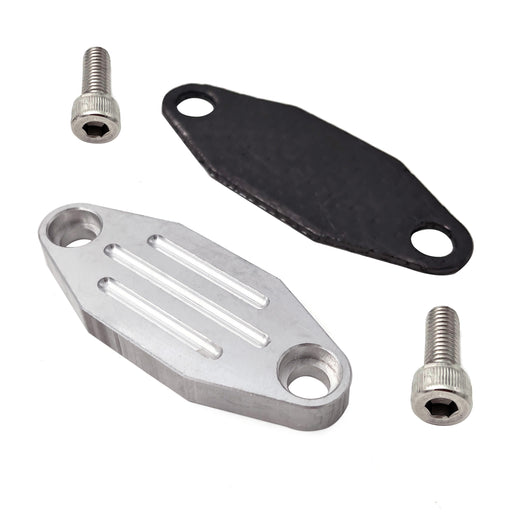
Step 3: Seal the Intake Manifold
Move to the driver's side of the engine. Position the machined intake blocker plate over the open intake manifold tract where the old EGR throttle valve sat. Ensure the sealing O-ring or gasket is perfectly seated in its groove, then torque the mounting hardware to 15 foot-pounds to prevent any future boost leaks.
Track-Proven Upgrades
If you are building a closed-course competition rig, an off-road puller, or a dedicated drag truck, simply replacing a broken stock valve with another stock valve is a temporary band-aid. True performance relies on completely removing the restriction. Upgrade your track vehicle using these premium, race-grade kits:
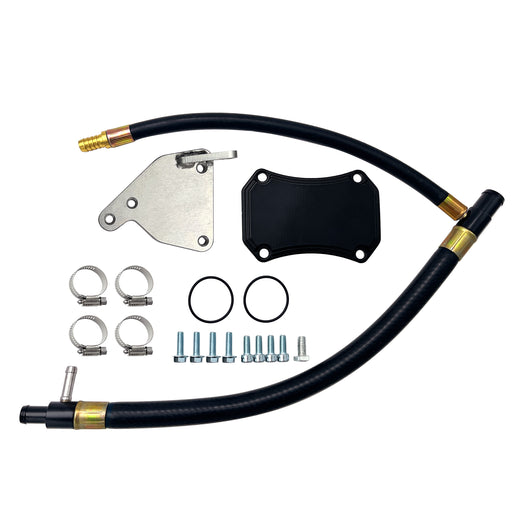
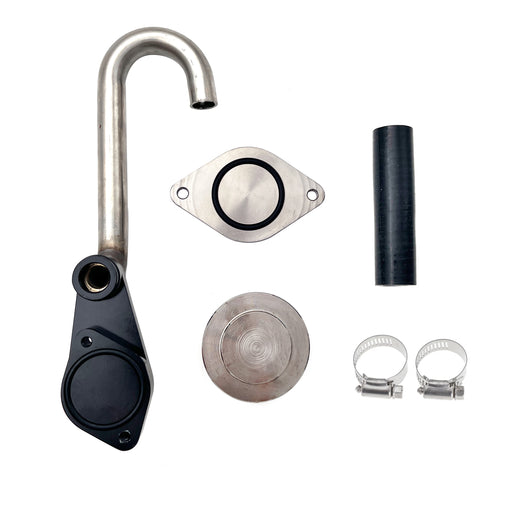
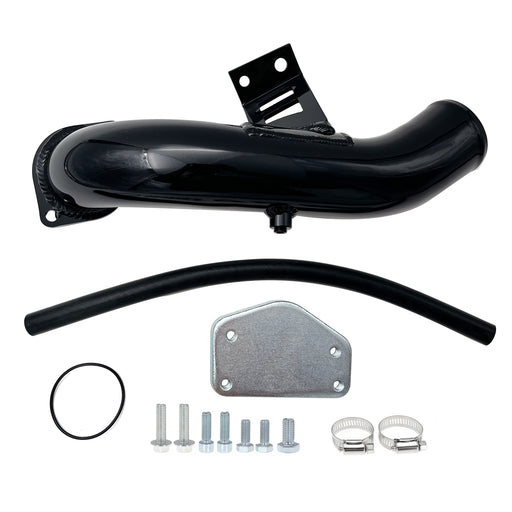
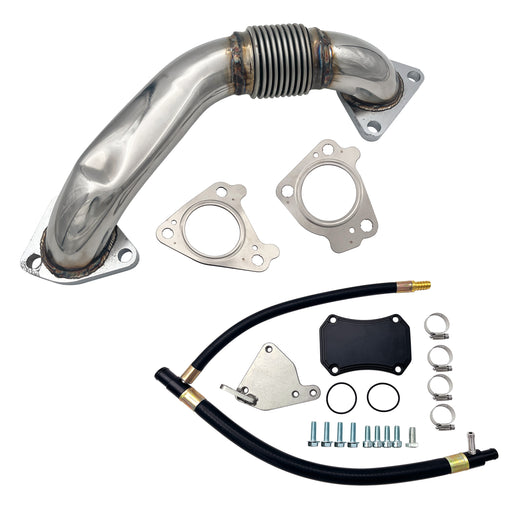
2010-2024 6.7L Cummins Dodge Ram EGR Throttle Valve Cooler Delete Kit
The ultimate 6.7L EGR Delete designed for closed-course competition platforms looking to completely clean up their under-hood architecture.

-
Aircraft-Grade Materials: Machined from robust, premium aluminum alloy paired with high-durability, temperature-resistant silicone couplers.
-
Complete Subsystem Replacement: Completely replaces both the fragile EGR Valve and the bulky EGR Cooler core—no secondary factory parts or extra trips to the auto parts store required.
-
Thermal Mitigation: Lowers overall engine coolant operating temperatures instantly by completely preventing engine coolant from circulating through the blistering-hot factory EGR thermal core.
-
Pure Oxygen Delivery: Halts the re-routing of scorching, oxygen-depleted waste exhaust gases back into your intake tract, protecting your motor from internal soot buildup.
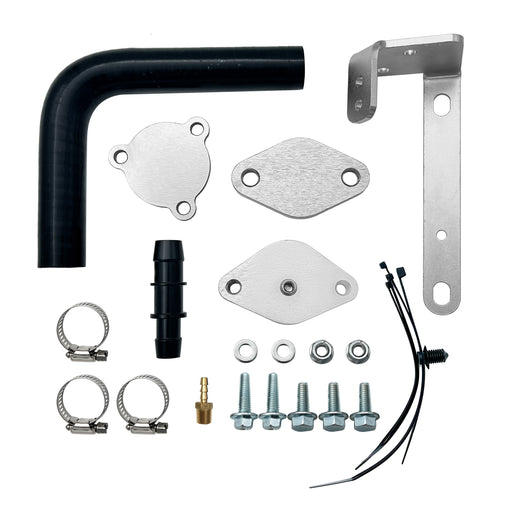
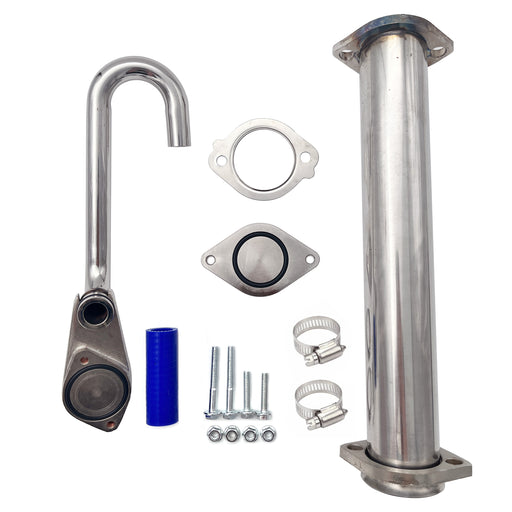
2009-2024 6.7L Ram Cummins 2500 3500 EGR Valve Cooler Delete Kit
This 2009-2024 Ram EGR kit is specifically designed for competitive racing drivers who place great emphasis on minimizing the weight of the packaging while maximizing the performance of the sensors and the flow rate on the track.

-
Premium Billet Aluminum: Precision CNC machined entirely from raw, high-strength aluminum alloy for a completely airtight, warp-proof seal against high manifold pressures.
-
Pre-Tapped Exhaust Manifold Block-Off: Comes pre-tapped and ready for an immediate, plug-and-play Exhaust Gas Temperature (EGT) data probe installation.
-
Advanced Coolant Riser Bracket: Features an improved integrated DDC riser bracket that mounts directly onto the engine block, completely eliminating the need to wrestle with rusty exhaust studs.
-
Rear Head Hot-Spot Relief: Intelligently redirects vital engine coolant flow directly to the rear of the cylinder head between cylinders 5 and 6, entirely neutralizing the infamous inline-six rear thermal hot spot.
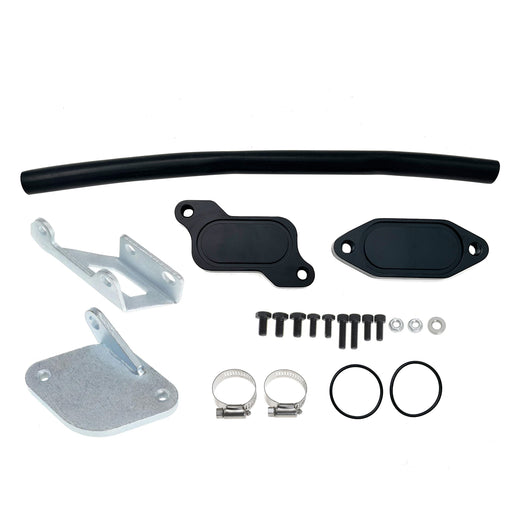
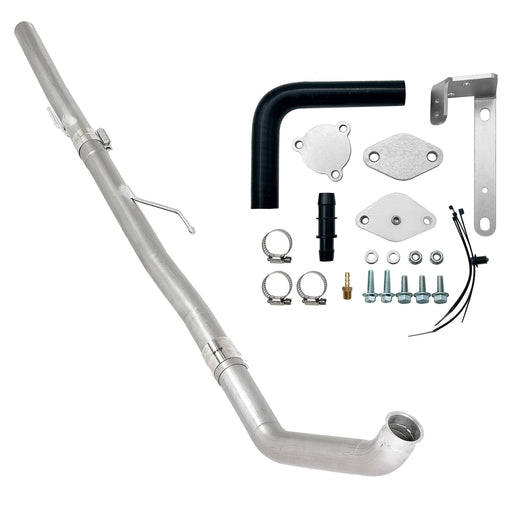
2013-2018 6.7L RAM Cummins 2500 3500 EGR Cooler Throttle Valve Delete Kit
A competition EGR cooler kit engineered precisely to maximize fluid dynamics and turbo response on late-model 6.7L Ram applications.

-
Optimized Flow Dynamics: Constructed from premium aluminum alloy and rugged silicone components to recirculate vital engine coolant significantly faster and more efficiently than the stock layout.
-
Soot Elimination: Completely drops out the restrictive EGR cooler, crossover tube, and valve actuator to permanently stop heavy carbon buildup inside your intake plumbing.
-
EGT Ready: Features a pre-tapped manifold block-off plate, providing track technicians an instant mounting location for real-time exhaust temperature tracking.
Post-Install Calibration & Care
If you have installed one of the track-proven competition kits listed above for off-road racing, follow these critical button-up steps:
-
Refill and Bleed Coolant: Pour your fresh diesel-grade coolant back into the radiator. Leave the radiator cap off, start the engine, and let it idle up to operating temperature to automatically purge any trapped air bubbles from the cooling system.
-
Flash Your Competition Tuning: You must flash a race-specific custom calibration file onto your ECM using your digital tuner to disable the EGR sensor codes. Without a race tune, the ECM will immediately place the engine into Limp Mode due to missing hardware data.
Pro-Tips for a Flawless DIY Installation
To save you from the most common garage headaches and ensure your installation goes perfectly smoothly on the first try, keep these pro-grade mechanical tricks in mind:
-
The Rusty Exhaust Stud Secret: Spray all manifold bolts with high-quality penetrating oil 24 hours BEFORE you begin the teardown. When loosening them, use a slow, steady hand pressure to avoid breaking a stud inside the head.
-
Label and Seal Factory Connectors: To prevent moisture, salt, and road grime from corroding the copper pins over time, wrap the open connector plugs tightly in electrical tape or secure them inside a small protective plastic baggie.
-
Mind the Engine Bay Drop-Zone: Stuff a clean shop rag into the open spaces beneath the rear cooler before you begin unbolting. If a screw slips out of your socket, the rag will catch it before it disappears into the chassis abyss.
Conclusion: Clean Power Wins
Whether you choose to perform a standard factory replacement or upgrade to a rugged, smooth-flowing aluminum block-off kit for track use, taking control of your truck's maintenance schedule is the ultimate way to unlock the true capability of the inline-six Cummins platform. You keep your intake air pristine, drop your thermal loads, and keep an extra $800 right where it belongs—in your wallet.
Ready to completely clean up your engine bay, bypass restrictive factory soot traps, and keep your truck running cooler than ever? Head over to www.seguler.com today to grab the premium, race-grade aluminum delete hardware your 6.7L Cummins deserves!
FAQs About Replace 6.7L Cummins EGR Valve
Q1: What happens if I snap an exhaust stud while installing the block-off plates?
A1: If a stud snaps above the thread line, you can usually back it out using locking vice-grips after applying heavy heat from a torch. If it snaps flush inside the cylinder head, you will have to use a precision alignment drilling jig and a screw extractor.
Q2: Do I absolutely need to drain the engine coolant before doing this install?
A2: The factory EGR cooler sits directly inline with the main engine cooling passages. If you try to unbolt the cooler assembly without draining the system first, you will instantly flood your engine valley, submerge your unbolted intake manifold ports, and create a massive, toxic mess on your garage floor.
Q3: Will these billet aluminum block-off plates warp under heavy towing heat?
A3: True billet aluminum has an exceptionally high thermal threshold and structural density. It expands and contracts at a rate that matches your engine components, creating a permanent, warp-proof seal even when your exhaust manifold sees extreme EGT loads.
Q4: What do I do with the factory electronic plugs after removing the EGR valve?
A4: Pack the open factory female plugs with dielectric grease, wrap them tightly with high-grade automotive electrical tape, and secure them safely to the main wiring loom using heavy-duty zip ties. Road salt, mud, and moisture will corrode the copper pins inside the harness plugs, creating massive electrical headaches if you ever need to return the truck to stock configuration.
Q5: Will a cleaner intake track from an EGR delete help resolve my truck’s low-end throttle lag?
A5: Absolutely. The factory setup clogs the intake throttle valve. Removing this restriction restores the intake tract to its full, factory-intended dimensions, allowing the variable-geometry turbocharger to force air into the cylinders instantly and significantly sharpening your off-the-line throttle response.
Featured collection
-
Seguler 1986-1995 Ford F150 F250 F350 Mustang Trucks EGR Simulator Eliminator / Block Off Plate Kit
SEGULEROriginal price $79.99 - Original price $79.99Original price$79.99$79.99 - $79.99Current price $79.99Block Off Plate Material: Aluminum alloy. Easy installation,and convenient to use. Made of CNC milled from aircraft grade Billet aluminum. Will N...
View full details -
Seguler 2009-2019 6.7L Ram Cummins Coolant Bypass Barb Adapter Leak Repair Kit
SEGULEROriginal price $35.99 - Original price $35.99Original price$35.99$35.99 - $35.99Current price $35.99Made of aerospace-grade billet aluminum. Effectively repair the problem of coolant leakage. Resist corrosion and rust for a long time and has good...
View full details -

For 2011-2023 6.7L Ford Powerstroke Diesel EGR Delete Kit
SEGULEROriginal price $109.99 - Original price $109.99Original price$109.99$109.99 - $109.99Current price $109.99Material: Aluminum alloy,Stainless steel. 10mm Hole exhaust cover plate for Ford EGT Probes. CNC machine of billet aluminum and stainless steel m...
View full details -

For 2010-Present Stage 2 ISX 15 CM2250 CM2350 EGR Delete Kit
SEGULEROriginal price $59.99 - Original price $59.99Original price$59.99$59.99 - $59.99Current price $59.99Material: Aluminum Two plates in this kit are made of 6061 aircraft grade billet aluminum anodized and CNC laser cut or CNC machined out of high q...
View full details -
For 2011-2016 6.6L GMC Chevy Duramax Diesel LML EGR Valve Cooler Delete Kit
SEGULEROriginal price $66.49 - Original price $66.49Original price$66.49$66.49 - $66.49Current price $66.49Material: Stainless steel, billet aluminum. Eliminate soot and block of EGR valve prevent high EGT from flow back into engine. Quicker turbo spoo...
View full details -
For 1996-2004 3.8L 4.6L 5.4L Ford GT SVT GT500 V8 Mustang Cobra EGR Delete kit And Exhaust Cap
SEGULEROriginal price $51.99 - Original price $51.99Original price$51.99$51.99 - $51.99Current price $51.99Placement on Vehicle:Front Billet aluminum IAC (idle air control) and EGR (exhaust gas recirculation) block-off plates add a distinctive touch to ...
View full details -
Seguler 2003-2007 6.0L FORD Powerstroke Diesel EGR Cooler Delete Kit
SEGULEROriginal price $56.14 - Original price $56.14Original price$56.14$56.14 - $56.14Current price $56.14Material: 304 stainless steel,Aluminum billet. Eliminate ash accumulation and EGR valve blockage. Improve the cooling effect and reduce the engi...
View full details -
For 2004-2005 6.6L Chevy GMC Silverado LLY Duramax Diesel EGR Delete Kit
SEGULEROriginal price $92.99 - Original price $92.99Original price$92.99$92.99 - $92.99Current price $92.99Material: Aluminum,Stainless steel,Silicone Eliminates soot build-up and clogged EGR Valves Direct replacement. No installation instruction. No Gl...
View full details -

For 2011-2023 6.7L Ford Powerstroke Diesel EGR Delete Kit
SEGULEROriginal price $85.99 - Original price $85.99Original price$85.99$85.99 - $85.99Current price $85.99Material: Aluminum alloy,Stainless steel. 10mm Hole exhaust cover plate for Ford EGT Probes. CNC machine of billet aluminum and stainless steel m...
View full details -
For 2014-2019 3.0L Dodge Ram 1500 EcoDiesel EGR Valve & Cooler Delete Kit
SEGULEROriginal price $72.99 - Original price $72.99Original price$72.99$72.99 - $72.99Current price $72.99Material: Aluminum,Stainless steel,Silicone. Eliminates soot build-up and clogged EGR Valves. EGR removed and the temperature in the engine compa...
View full details -

Seguler 2010-2024 6.7L Dodge Ram Cummins Diesel EGR Valve Cooler Delete Kit
SEGULEROriginal price $89.99 - Original price $89.99Original price$89.99$89.99 - $89.99Current price $89.99Material: Aluminum alloy,silicone This kit is intended for off road use. Eliminates soot build up and clogged EGR Valves. Hot exhaust gasses ar...
View full details -
For 2006-2007 6.6L Chevrolet Silverado Classic GMC Duramax LBZ Diesel EGR Valve Cooler Delete Kit
SEGULEROriginal price $63.49 - Original price $63.49Original price$63.49$63.49 - $63.49Current price $63.49Material: Aluminum,Stainless steel,Silicone Eliminates soot build-up and clogged EGR Valves Guaranteed to last under high temperatures and pressu...
View full details -

Seguler 2017-2019 L5P Duramax Diesel 4pcs L5P Can Bus Plugs Connector Replacement
SEGULEROriginal price $75.00 - Original price $75.00Original price$75.00$75.00 - $75.00Current price $75.00Material: ABS For use with an Aftermarket Exhaust System. A new engine calibration is required. Plugs will replace NOX and DEF modules. The L...
View full details -

Seguler 2020-2023 chevy duramax L5P Diesel Can Bus Plugs Connector
SEGULEROriginal price $80.00 - Original price $80.00Original price$80.00$80.00 - $80.00Current price $80.00For use with aftermarket exhaust systems or delete pipes Used when removing the DPF/DEF systems These plugs will go in place of the NOx and DEF mo...
View full details -
Seguler 2003-2007 6.0L Ford F250 F350 Powerstroke Diesel EGR Basic Cooler Kit
SEGULEROriginal price $79.99 - Original price $79.99Original price$79.99$79.99 - $79.99Current price $79.99CNC machine of Aluminum and Stainless Steel billets. Resist corrosion and rust for a long time and has good heat dissipation. Reduce component a...
View full details -

For 2011-2023 6.7L Ford F250 F350 F450 F550 Powerstroke Diesel EGR Valve Delete Cooler Delete Kit
SEGULEROriginal price $55.99 - Original price $55.99Original price$55.99$55.99 - $55.99Current price $55.99Material: Aluminum alloy,Stainless steel. Black Anodized components for better durability. 12mm Hole exhaust cover plate for Ford EGT Probes. E...
View full details -
Seguler 2011-2016 6.6L GMC Chevy Duramax Diesel LML Up-Pipe & EGR Valve Cooler Delete Kit
SEGULEROriginal price $173.86 - Original price $173.86Original price$173.86$173.86 - $173.86Current price $173.86Material: 304 Stainless Steel. Reduce the amount of carbon deposited from exhaust to intake. Thanks to its fast airflow and superior engineered ex...
View full details -

For 2017-2023 6.6L Chevy GMC Duramax L5P diesel EGR Valve Cooler Delete kit
SEGULEROriginal price $131.99 - Original price $131.99Original price$131.99$131.99 - $131.99Current price $131.99Material:Aluminum Alloy ,Stainless steel,Silica gel Improved Performance: Eliminating the EGR system leads to better exhaust flow and faster tur...
View full details -
For 1983-1997 Ford F150 F250 F350 Mustang Trucks EGR Delete Block Off Plate Kit
SEGULEROriginal price $22.87 - Original price $22.87Original price$22.87$22.87 - $22.87Current price $22.87Material: Aluminum alloy. Easy installation,and convenient to use. Made of CNC milled from aircraft grade Billet aluminum. Will Not Warp or Deform...
View full details -
Seguler 3" Ecodiesel DPF Delete Pipe & EGR Delete kit for 2014-2018 3.0L Ram
SEGULEROriginal price $342.00 - Original price $342.00Original price$342.00$342.00 - $342.00Current price $342.00Material: High quality stainless steel Inlet Diameter: 3.0" Eliminates soot build-up and clogged EGR Valves Specialized designs to ensure a perfec...
View full details -

For 2013-2023 6.7L Dodge Ram Cummins Cab & Chassis EGR Delete Kit Diesel
SEGULEROriginal price $62.99 - Original price $62.99Original price$62.99$62.99 - $62.99Current price $62.99Material: Aluminum alloy. Eliminates soot build up and clogged EGR Valves. Hot exhaust gasses are not being re-routed back into the motor. Coo...
View full details -
Seguler 2011-2023 6.7L Ford Powerstroke CCV PCV Reroute Engine Ventilation Kit
SEGULEROriginal price $82.99 - Original price $82.99Original price$82.99$82.99 - $82.99Current price $82.99Venturi style design eliminates the need for restrictive baffles, streamline routing with no angles, provides better pressure flow and no oil drip...
View full details -
For 11-23 Ford 6.7L Powerstroke CCV/PCV Reroute/Delete Engine Ventilation Kit
SEGULEROriginal price $72.00 - Original price $72.00Original price$72.00$72.00 - $72.00Current price $72.00Material:Aluminum alloy rubber. Black Anodized components for better durability. This Crankcase Ventilation System provides a SOLID solution to ...
View full details -

For 2007-2010 Cummins ISX CM871 EGR Plug Kit Stage 2 Plates and Plugs Aluminum
SEGULEROriginal price $67.99 - Original price $67.99Original price$67.99$67.99 - $67.99Current price $67.99Material:304 Stainless Steel & Billet Aluminum. High-temperature graphite gaskets are adopted to prevent leakage. Used to delete the EGR val...
View full details -
For 2007-2010 6.6L Chevy GMC LMM Duramax EGR Valve Cooler Delete Kit Fit
SEGULEROriginal price $61.99 - Original price $61.99Original price$61.99$61.99 - $61.99Current price $61.99Material: Aluminum alloy,Stainless steel. Improves engine life by eliminating soot build-up and reducing fuel consumption. EGR valve cooler delet...
View full details


Leave a comment